Thursday, September 30, 2021

thumbnail

How to increase GitHub Appliance storage

 Increasing storage capacity

You can increase or change the amount of storage available for Git repositories, databases, search indexes, and other persistent application data.


Warning: The process for allocating new system resources varies by virtualization platform and resource type. You should always configure the monitoring and alerting of key system resources. For more information, see "Monitoring your GitHub Enterprise Server appliance."

As more users join your GitHub Enterprise Server instance, you may need to resize your storage volume. Refer to the documentation for your virtualization platform for information on resizing storage.

 Requirements and recommendations

Note: Before resizing any storage volume, put your instance in maintenance mode. For more information, see "Enabling and scheduling maintenance mode."

 Minimum requirements

User licensesvCPUsMemoryAttached storageRoot storage
Trial, demo, or 10 light users432 GB150 GB200 GB
10 to 3,000848 GB300 GB200 GB
3,000 to 50001264 GB500 GB200 GB
5,000 to 80001696 GB750 GB200 GB
8,000 to 10,000+20160 GB1000 GB200 GB

If you plan to enable GitHub Actions for the users of your instance, review the requirements for hardware, external storage, and runners in "Getting started with GitHub Actions for GitHub Enterprise Server."

For more information about adjusting resources for an existing instance, see "Increasing storage capacity" and "Increasing CPU or memory resources."

 Increasing the data partition size

  1. Resize the existing user volume disk using your virtualization platform's tools.
  2. SSH into your GitHub Enterprise Server instance. For more information, see "Accessing the administrative shell (SSH)."
    $ ssh -p 122 admin@HOSTNAME
  3. Put the appliance in maintenance mode. For more information, see "Enabling and scheduling maintenance mode."
  4. Reboot the appliance to detect the new storage allocation:
    $ sudo reboot
  5. Run the ghe-storage-extend command to expand the /data/user filesystem:
    $ ghe-storage-extend

Increasing the root partition size using a new appliance

  1. Set up a new GitHub Enterprise Server instance with a larger root disk using the same version as your current appliance. For more information, see "Setting up a GitHub Enterprise Server instance."
  2. Shut down the current appliance:
    $ sudo poweroff
  3. Detach the data disk from the current appliance using your virtualization platform's tools.
  4. Attach the data disk to the new appliance with the larger root disk.

 Increasing the root partition size using an existing appliance

Warning: Before increasing the root partition size, you must put your instance in maintenance mode. For more information, see "Enabling and scheduling maintenance mode."

  1. Attach a new disk to your GitHub Enterprise Server appliance.

  2. Run the parted command to format the disk:

    $ sudo parted /dev/xvdg mklabel msdos
    $ sudo parted /dev/xvdg mkpart primary ext4 0% 50%
    $ sudo parted /dev/xvdg mkpart primary ext4 50% 100%
  3. Run the ghe-upgrade command to install a full, platform specific package to the newly partitioned disk. A universal hotpatch upgrade package, such as github-enterprise-2.11.9.hpkg, will not work as expected. After the ghe-upgrade command completes, application services will automatically terminate.

    $ ghe-upgrade PACKAGE-NAME.pkg -s -t /dev/xvdg1
  4. Shut down the appliance:

    $ sudo poweroff
  5. In the hypervisor, remove the old root disk and attach the new root disk at the same location as the old root disk.

  6. Start the appliance.

  7. Ensure system services are functioning correctly, then release maintenance mode. For more information, see "Enabling and scheduling maintenance mode."

thumbnail

How to login to GitHub Appliance

 For logging to GitHub appliance please follow the following steps using key pair:


1. First you need to create a keypair using "ssh-keygen" command. in this example am creating the private/public key as separate key without using existing id_rsa name.

# ssh-keygen 

Generating public/private rsa key pair.

Enter file in which to save the key (/root/.ssh/id_rsa): /root/.ssh/github-test

Enter passphrase (empty for no passphrase): 

Enter same passphrase again: 

Your identification has been saved in /root/.ssh/github-test.

Your public key has been saved in /root/.ssh/github-test.pub.

The key fingerprint is:

SHA256:G+dgUmIusjsaCQsHoo1JClafiQE10jFd4AmkKfd0hLA root@acg-vm1

The key's randomart image is:

+---[RSA 2048]----+

| o*@oo+.         |

|  =oXo+          |

|==E..*+ .        |

|O* o + o         |

|B + o o S .      |

|o+ o . o *       |

|+ .     . .      |

| ...             |

|....             |

+----[SHA256]-----+

2. github appliance uses port 122 to ssh into it. since we have created custom key pair we need to specify it when ssh into it.

# ssh -i /root/.ssh/github-test -p 122 admin@github-test

# ssh -i /root/.ssh/github-test -p 122 admin@github-test
     ___ _ _   _  _      _      ___     _                    _
    / __(_) |_| || |_  _| |__  | __|_ _| |_ ___ _ _ _ __ _ _(_)___ ___
   | (_ | |  _| __ | || | '_ \ | _|| ' \  _/ -_) '_| '_ \ '_| (_-</ -_)
    \___|_|\__|_||_|\_,_|_.__/ |___|_||_\__\___|_| | .__/_| |_/__/\___|
                                                   |_|

Administrative shell access is permitted for troubleshooting and performing
documented operations procedures only. Modifying system and application files,
running programs, or installing unsupported software packages may void your
support contract. Please contact GitHub Enterprise technical support at
https://enterprise.github.com/support if you have a question about the
activities allowed by your support contract.

INFO: Release version: 3.1.7
INFO: 4 CPUs, 31GB RAM on VMWare
INFO: License: production; Seats: 655 of 932; Will expire in 25 days.
INFO: Load average: 1.57 1.22 1.28
INFO: Usage for root disk: 30G of 98G (33%)
INFO: Usage for user data disk: 81G of 271G (32%)
INFO: TLS: enabled; Certificate will expire in 61 days.
INFO: HA: standalone
INFO: Configuration run in progress: false
Last login: Thu Sep 30 05:21:44 2021 from 10.6.46.51

3. To check the partition details and disk usage use the following command.

# lsblk
NAME                                 MAJ:MIN RM  SIZE RO TYPE MOUNTPOINT
sda                                    8:0    0  250G  0 disk 
\u251c\u2500sda1                                 8:1    0  100G  0 part 
\u2514\u2500sda2                                 8:2    0  100G  0 part /
sdb                                    8:16   0  275G  0 disk 
\u2514\u2500ghe_storage_74ae6d58-ghe_user_data 254:0    0  275G  0 lvm  /data/user

# df -h /data/user
Filesystem                                      Size  Used Avail Use% Mounted on
/dev/mapper/ghe_storage_74ae6d58-ghe_user_data  271G   81G  177G  32% /data/user


Tuesday, September 28, 2021

thumbnail

How to extend an LVM partition in Linux

 How to extend LVM based filesystem


To increase the space for LVM partition follow the steps given below:

1. Verify availability of the new space.

# lsblk
NAME            MAJ:MIN RM  SIZE RO TYPE MOUNTPOINT
sda               8:0    0  500G  0 disk 
\u251c\u2500sda1            8:1    0  512M  0 part /boot
\u251c\u2500sda2            8:2    0 29.5G  0 part 
\u2502 \u251c\u2500centos-root 253:0    0  799G  0 lvm  /
\u2502 \u2514\u2500centos-swap 253:1    0  512M  0 lvm  [SWAP]
\u251c\u2500sda3            8:3    0  220G  0 part 
\u2502 \u2514\u2500centos-root 253:0    0  799G  0 lvm  /
\u2514\u2500sda4            8:4    0  250G  0 part 
  \u2514\u2500centos-root 253:0    0  799G  0 lvm  /
sdb               8:16   0  100G  0 disk 
\u2514\u2500sdb1            8:17   0  100G  0 part 
  \u2514\u2500centos-root 253:0    0  799G  0 lvm  /
sdc               8:32   0  200G  0 disk 
\u2514\u2500sdc1            8:33   0  200G  0 part 
  \u2514\u2500centos-root 253:0    0  799G  0 lvm  /
sdd               8:48   0  200G  0 disk 
sr0              11:0    1 1024M  0 rom 

2. Create additional partition for the new swap partition.

# fdisk /dev/sdd
Welcome to fdisk (util-linux 2.23.2).

Changes will remain in memory only, until you decide to write them.
Be careful before using the write command.

Device does not contain a recognized partition table
Building a new DOS disklabel with disk identifier 0x165e0fac.

Command (m for help): n
Partition type:
   p   primary (0 primary, 0 extended, 4 free)
   e   extended
Select (default p): 
Using default response p
Partition number (1-4, default 1): 
First sector (2048-419430399, default 2048): 
Using default value 2048
Last sector, +sectors or +size{K,M,G} (2048-419430399, default 419430399): 
Using default value 419430399
Partition 1 of type Linux and of size 200 GiB is set

Command (m for help): t
Selected partition 1
Hex code (type L to list all codes): 8e
Changed type of partition 'Linux' to 'Linux LVM'

Command (m for help): p

Disk /dev/sdd: 214.7 GB, 214748364800 bytes, 419430400 sectors
Units = sectors of 1 * 512 = 512 bytes
Sector size (logical/physical): 512 bytes / 512 bytes
I/O size (minimum/optimal): 512 bytes / 512 bytes
Disk label type: dos
Disk identifier: 0x165e0fac

   Device Boot      Start         End      Blocks   Id  System
/dev/sdd1            2048   419430399   209714176   8e  Linux LVM

Command (m for help): w
The partition table has been altered!

Calling ioctl() to re-read partition table.
Syncing disks.

3. Activate the new partition.

# partprobe

4. Verify the new partition is available.

# lsblk
NAME            MAJ:MIN RM  SIZE RO TYPE MOUNTPOINT
sda               8:0    0  500G  0 disk 
\u251c\u2500sda1            8:1    0  512M  0 part /boot
\u251c\u2500sda2            8:2    0 29.5G  0 part 
\u2502 \u251c\u2500centos-root 253:0    0  799G  0 lvm  /
\u2502 \u2514\u2500centos-swap 253:1    0  512M  0 lvm  [SWAP]
\u251c\u2500sda3            8:3    0  220G  0 part 
\u2502 \u2514\u2500centos-root 253:0    0  799G  0 lvm  /
\u2514\u2500sda4            8:4    0  250G  0 part 
  \u2514\u2500centos-root 253:0    0  799G  0 lvm  /
sdb               8:16   0  100G  0 disk 
\u2514\u2500sdb1            8:17   0  100G  0 part 
  \u2514\u2500centos-root 253:0    0  799G  0 lvm  /
sdc               8:32   0  200G  0 disk 
\u2514\u2500sdc1            8:33   0  200G  0 part 
  \u2514\u2500centos-root 253:0    0  799G  0 lvm  /
sdd               8:48   0  200G  0 disk 
\u2514\u2500sdd1            8:49   0  200G  0 part 
sr0              11:0    1 1024M  0 rom 

Note: a reboot may be needed if the change does not show at this point.

5. Create a new physical volume on the LUN.

# pvcreate /dev/sdd1

6. Add the new volume to the volume group for the swap volume. Our examples use centos and /dev/sdd1; replace with the volume names and devices as appropriate to your deployment.

# vgextend centos /dev/sdd1

7. Using vgdisplay command we can find out available Free PE(Physical Extents)/ Size

# vgdisplay 
  --- Volume group ---
  VG Name               centos
  System ID             
  Format                lvm2
  Metadata Areas        6
  Metadata Sequence No  12
  VG Access             read/write
  VG Status             resizable
  MAX LV                0
  Cur LV                2
  Open LV               2
  Max PV                0
  Cur PV                6
  Act PV                6
  VG Size               <999.48 GiB
  PE Size               4.00 MiB
  Total PE              255866
  Alloc PE / Size       204667 / 799.48 GiB
  Free  PE / Size       51199 / <200.00 GiB
  VG UUID               s9r38a-nQQX-eDR7-l9AW-PiTV-xW6i-o6H4rg

8. Resize the logical volume to the desired size.

# lvextend -l +51199 /dev/centos/root
  Size of logical volume centos/root changed from 798.98 GiB (204539 extents) to <998.98 GiB (255738 extents).
  Logical volume centos/root successfully resized.

9. Format the extended volume for xfs file system. use "resize2fs /dev/centos/root"

# xfs_growfs /dev/centos/root
meta-data=/dev/mapper/centos-root isize=512    agcount=111, agsize=1900288 blks
         =                       sectsz=512   attr=2, projid32bit=1
         =                       crc=1        finobt=0 spinodes=0
data     =                       bsize=4096   blocks=209447936, imaxpct=25
         =                       sunit=0      swidth=0 blks
naming   =version 2              bsize=4096   ascii-ci=0 ftype=1
log      =internal               bsize=4096   blocks=3711, version=2
         =                       sectsz=512   sunit=0 blks, lazy-count=1
realtime =none                   extsz=4096   blocks=0, rtextents=0
data blocks changed from 209447936 to 261875712

10. Enable the logical volume.

# lsblk
NAME            MAJ:MIN RM  SIZE RO TYPE MOUNTPOINT
sda               8:0    0  500G  0 disk 
\u251c\u2500sda1            8:1    0  512M  0 part /boot
\u251c\u2500sda2            8:2    0 29.5G  0 part 
\u2502 \u251c\u2500centos-root 253:0    0  999G  0 lvm  /
\u2502 \u2514\u2500centos-swap 253:1    0  512M  0 lvm  [SWAP]
\u251c\u2500sda3            8:3    0  220G  0 part 
\u2502 \u2514\u2500centos-root 253:0    0  999G  0 lvm  /
\u2514\u2500sda4            8:4    0  250G  0 part 
  \u2514\u2500centos-root 253:0    0  999G  0 lvm  /
sdb               8:16   0  100G  0 disk 
\u2514\u2500sdb1            8:17   0  100G  0 part 
  \u2514\u2500centos-root 253:0    0  999G  0 lvm  /
sdc               8:32   0  200G  0 disk 
\u2514\u2500sdc1            8:33   0  200G  0 part 
  \u2514\u2500centos-root 253:0    0  999G  0 lvm  /
sdd               8:48   0  200G  0 disk 
\u2514\u2500sdd1            8:49   0  200G  0 part 
  \u2514\u2500centos-root 253:0    0  999G  0 lvm  /
sr0              11:0    1 1024M  0 rom  

11. View the new size.

# df -h /
Filesystem               Size  Used Avail Use% Mounted on
/dev/mapper/centos-root  999G  755G  245G  76% /
thumbnail

How to extend an LVM swap partition in Linux

Swap filesystem


Swap is used if there is not enough memory available for your application. It’s normal and can be a good thing for Linux systems to use swap, even if there is still available RAM. But, it’s not just used if there is not enough memory.

How to extend LVM based swap filesystem

To increase the space for LVM Swap partition follow the steps given below:

1. Verify availability of the new space.

# lsblk
NAME                        MAJ:MIN RM  SIZE RO TYPE MOUNTPOINT
sda                           8:0    0   30G  0 disk 
\u251c\u2500sda1                        8:1    0  512M  0 part /boot
\u2514\u2500sda2                        8:2    0 29.5G  0 part 
  \u251c\u2500VolGroup_ID_001-rootlv1 253:0    0   29G  0 lvm  /
  \u2514\u2500VolGroup_ID_001-swaplv1 253:1    0  512M  0 lvm  [SWAP]
sdb                           8:16   0   30G  0 disk 
\u2514\u2500sdb1                        8:17   0   30G  0 part 
  \u2514\u2500VolGroup_ID_002-tmplv1  253:2    0   30G  0 lvm  /tmp
sdc                           8:32   0    2T  0 disk 
\u251c\u2500sdc1                        8:33   0    2T  0 part 
\u2514\u2500sdc9                        8:41   0    8M  0 part 
sdd                           8:48   0    6G  0 disk 
sr0                          11:0    1 1024M  0 rom  
# fdisk -l /dev/sdd

Disk /dev/sdd: 6442 MB, 6442450944 bytes, 12582912 sectors
Units = sectors of 1 * 512 = 512 bytes
Sector size (logical/physical): 512 bytes / 512 bytes
I/O size (minimum/optimal): 512 bytes / 512 bytes

2. Create additional partition for the new swap partition.

# fdisk /dev/sdd
Welcome to fdisk (util-linux 2.23.2).

Changes will remain in memory only, until you decide to write them.
Be careful before using the write command.

Device does not contain a recognized partition table
Building a new DOS disklabel with disk identifier 0x26e84ac1.

Command (m for help): n
Partition type:
   p   primary (0 primary, 0 extended, 4 free)
   e   extended
Select (default p): 
Using default response p
Partition number (1-4, default 1): 
First sector (2048-12582911, default 2048): 
Using default value 2048
Last sector, +sectors or +size{K,M,G} (2048-12582911, default 12582911): 
Using default value 12582911
Partition 1 of type Linux and of size 6 GiB is set

Command (m for help): t
Selected partition 1
Hex code (type L to list all codes): 82
Changed type of partition 'Linux' to 'Linux swap / Solaris'

Command (m for help): p

Disk /dev/sdd: 6442 MB, 6442450944 bytes, 12582912 sectors
Units = sectors of 1 * 512 = 512 bytes
Sector size (logical/physical): 512 bytes / 512 bytes
I/O size (minimum/optimal): 512 bytes / 512 bytes
Disk label type: dos
Disk identifier: 0x26e84ac1

   Device Boot      Start         End      Blocks   Id  System
/dev/sdd1            2048    12582911     6290432   82  Linux swap / Solaris

Command (m for help): w
The partition table has been altered!

Calling ioctl() to re-read partition table.
Syncing disks.

3. Activate the new partition.

# partprobe

4. Verify the new partition is available.

# lsblk
NAME                        MAJ:MIN RM  SIZE RO TYPE MOUNTPOINT
sda                           8:0    0   30G  0 disk 
\u251c\u2500sda1                        8:1    0  512M  0 part /boot
\u2514\u2500sda2                        8:2    0 29.5G  0 part 
  \u251c\u2500VolGroup_ID_001-rootlv1 253:0    0   29G  0 lvm  /
  \u2514\u2500VolGroup_ID_001-swaplv1 253:1    0  512M  0 lvm  [SWAP]
sdb                           8:16   0   30G  0 disk 
\u2514\u2500sdb1                        8:17   0   30G  0 part 
  \u2514\u2500VolGroup_ID_002-tmplv1  253:2    0   30G  0 lvm  /tmp
sdc                           8:32   0    2T  0 disk 
\u251c\u2500sdc1                        8:33   0    2T  0 part 
\u2514\u2500sdc9                        8:41   0    8M  0 part 
sdd                           8:48   0    6G  0 disk 
\u2514\u2500sdd1                        8:49   0    6G  0 part 
sr0                          11:0    1 1024M  0 rom  

Note: a reboot may be needed if the change does not show at this point.

5. Create a new physical volume on the LUN.

# pvcreate /dev/sdd1

6. Add the new volume to the volume group for the swap volume. Our examples use VolGroup_ID_001 and /dev/sdd1; replace with the volume names and devices as appropriate to your deployment.

# vgextend VolGroup_ID_001 /dev/sdd1

7. Disable swapping for the associated physical volume.

# swapoff -v /dev/VolGroup_ID_001/swaplv1

8. Resize the logical volume to the desired size.

lvresize /dev/VolGroup_ID_001/swaplv1 -l +1535

9. Format the extended swap volume.

# mkswap /dev/VolGroup_ID_001/swaplv1

10. Enable the logical volume.

# swapon -va

11. View the new swap size.

# free -m
              total        used        free      shared  buff/cache   available
Mem:          32013         886       29748           9        1378       30723
Swap:          6651           0        6651
# free
total used free shared buffers cached
Mem: 1784432 196920 1587512 516 12624 77268
-/+ buffers/cache: 107028 1677404
Swap: 1257468 0 1257468

Wednesday, September 15, 2021

thumbnail

Troubleshooting High Load Average on Linux

Load average is a key metric to measure CPU performance and system performance on Linux. Today we will learn what system load average means and how to check the high load average on Linux


Understanding Load Average

What Is system Load in Linux? System load is a measure of the amount of work (meaning the number of currently active and queued processes) being performed by the CPU as a percentage of total capacity. Load averages that represent system activity over time, because they present a much more accurate picture of the state of our system, are a better way to represent this metric.


The load on a system is the total amount of running and blocking process. For example, if two processes were running and five were blocked to run, the system’s load would be seven.

The load average is the amount of load over a given amount of time. Typically, the load average is taken over 1 minute, 5 minutes, and 15 minutes. This enables you to see how the load changes over time.


We can use the following command to get the running process and blocking process. It should be the same as the load average.

ps -eo s,user,cmd | grep ^[RD] |wc -l

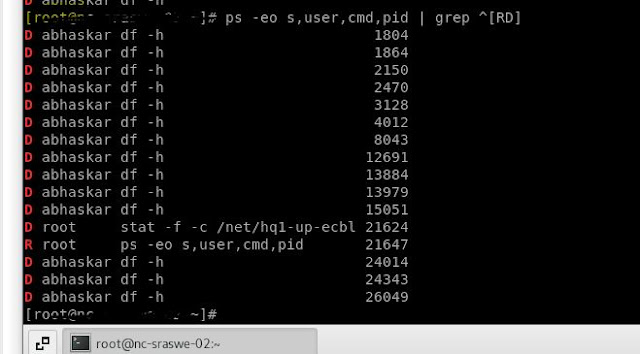
ps -eo s,user,cmd,pid | grep ^[RD] |wc -l


D uninterruptible sleep (usually IO) R running or runnable (on run queue) kill those pid for the respective D and then check the uptime, it should be reduced. Before:


After:


Check High System Load average

How to Check Load Average in Linux? We have 4 ways to check the load average on Linux.

  • cat /proc/loadavg

  • uptime

  • w

  • top

Powered by Blogger.